



Probably most of us have heard of such a hit in the keyboard world as the Lucky65 V2 from Weikav. Since its release, its popularity has not faded. Many reviewers called it one of the best budget keyboards. And indeed, the Lucky65 V2 offered features previously available only in much more expensive premium keyboards. And it did so at a very attractive price. It literally raised budget keyboards to a whole new level, setting a new standard for the segment. Users appreciated this, which is why the Lucky65 V2 firmly established itself as the king of budget keyboards and still regularly appears in recommendation lists today.
But as we can guess from the V2 suffix in the name, before gaining this recognition, a certain path was taken. There was version one, which at that time was simply called Lucky65. And even before Lucky65 (V1), there was Sugar65. So, essentially, the NUT65 is already the fourth iteration of the aluminum 65% keyboard from Weikav. And this is actually reflected in the keyboard’s name. Here’s how Weikav explains the idea behind the name on their official website:
“Its name is inspired by the lifecycle of a nut – from blossom to harvest, the result of patience and growth. NUT65 is our most mature work yet, infused with every piece of technical mastery we’ve acquired. NUT65 represents not just a product, but the story of our evolution.”
So, Weikav stated that NUT65 is not just another keyboard. It is the result of many years of experience and evolution of ideas. I think I’m not the only one curious whether this keyboard will live up to expectations, and whether it manages not only to preserve the spirit of its predecessors but also to surpass them. In this review, I will take a detailed look at what NUT65 offers, how it differs from its predecessor Lucky65 V2, and whether it is truly worth your attention.
- NUT65 Features and Specifications
- Colorways and Finishes
- Unboxing: What’s Inside?
- Design and Build Quality
- Connectivity and Battery
- Software: Unlocking the Potential
- Keycaps
- Switches and Stabilizers
- Structure and Mounting
- Typing Feel and Sound
- Differences Between NUT65 and Lucky65 V2
- Pros and Cons
- Final Verdict
NUT65 Features and Specifications
Notable Features:
- Ball-catch quick disassembly structure
- Supports two gasket mount styles
- Built-in lightbar
- Magnetic pogo pin connector between PCB and daughterboard
- Dual driver support – VIA and proprietary web driver
- Extended customization possibilities – alternative plates and PCB are available
- Fancy dongle compartment
Brief technical specifications:
- Layout: 65% ANSI, 66 Keys
- Case Material: 6063 Aluminum, 220-grit CNC finish
- Finish Technology: Anodizing / Electrophoresis
- Keycaps: Not Included
- Switches: Not Included
- Stabilizers: Plate-mounted, Pre-lubed
- Mounting: PCB “Silicone Socks” Gasket Mount / Plate “Silicone Beans” Gasket Mount
- Plate: FR4, Flex Cuts by Default
- PCB: 1.2 mm, Flex Cuts by Default
- Hot-swappable: Yes, 3/5-pin Mechanical Switches
- Sound Dampening: 5 Layers
- Backlight: South-facing LEDs with Per-key RGB Support
- Software: QMK/VIA and Proprietary Web Driver
- Connectivity: Wired, 2.4GHz, Bluetooth
- Polling Rate: 1000Hz (Wired & 2.4GHz), 125Hz (Bluetooth)
- Anti-Ghosting: N-Key Rollover
- Battery: 6000 mAh
- Dimensions: 314 x 113 x 19.5 mm
- Weight: 1120g
Colorways and Finishes
Originally, the NUT65 is available only as a barebone kit – meaning it comes without switches and keycaps, and is offered in six different colors:
- Black (Anodized)
- Red (Anodized)
- Silver (Anodized)
- Warm White (E-Coated)
- Cold White (E-Coated)
- Pink (E-Coated)
However, since its initial release, several new colors have been added to the lineup, along with updated versions featuring a copper weight.
In this review, the keyboard featured will be the classic black version.
Unboxing: What’s Inside?

The keyboard comes in a standard cardboard box, securely and snugly surrounded by a thick layer of foam on all sides. Additionally, to protect it from dust and scratches during transportation, it is wrapped in a smooth plastic bag. The 2.4G dongle is stored in a special compartment inside the keyboard – more on that later.
Besides the keyboard, the box contains two cards. The first one describes the lightbar operation modes. The second card is a quick-start guide covering the main points, such as FN shortcut keys, combinations for switching connection modes and lighting modes, as well as explaining how the battery indicator works.
There is also a small white box containing a combined keycap and switch puller, a standard USB Type-A to Type-C rubber cable, and a small bag with 10 extra cylindrical “silicone bean” gaskets. Only 8 can be installed on the plate, so 2 are spares. Great! It’s very nice to have a few extras just in case.
So overall, in the box you’ll get:
- Keyboard itself
- USB-C to USB-A cable
- 2.4G USB receiver (stored in keyboard)
- 2-in-1 keycap and switch puller
- 10 spare “silicone bean” gaskets
- Quick-start guide
- Lightbar reference card
Design and Build Quality
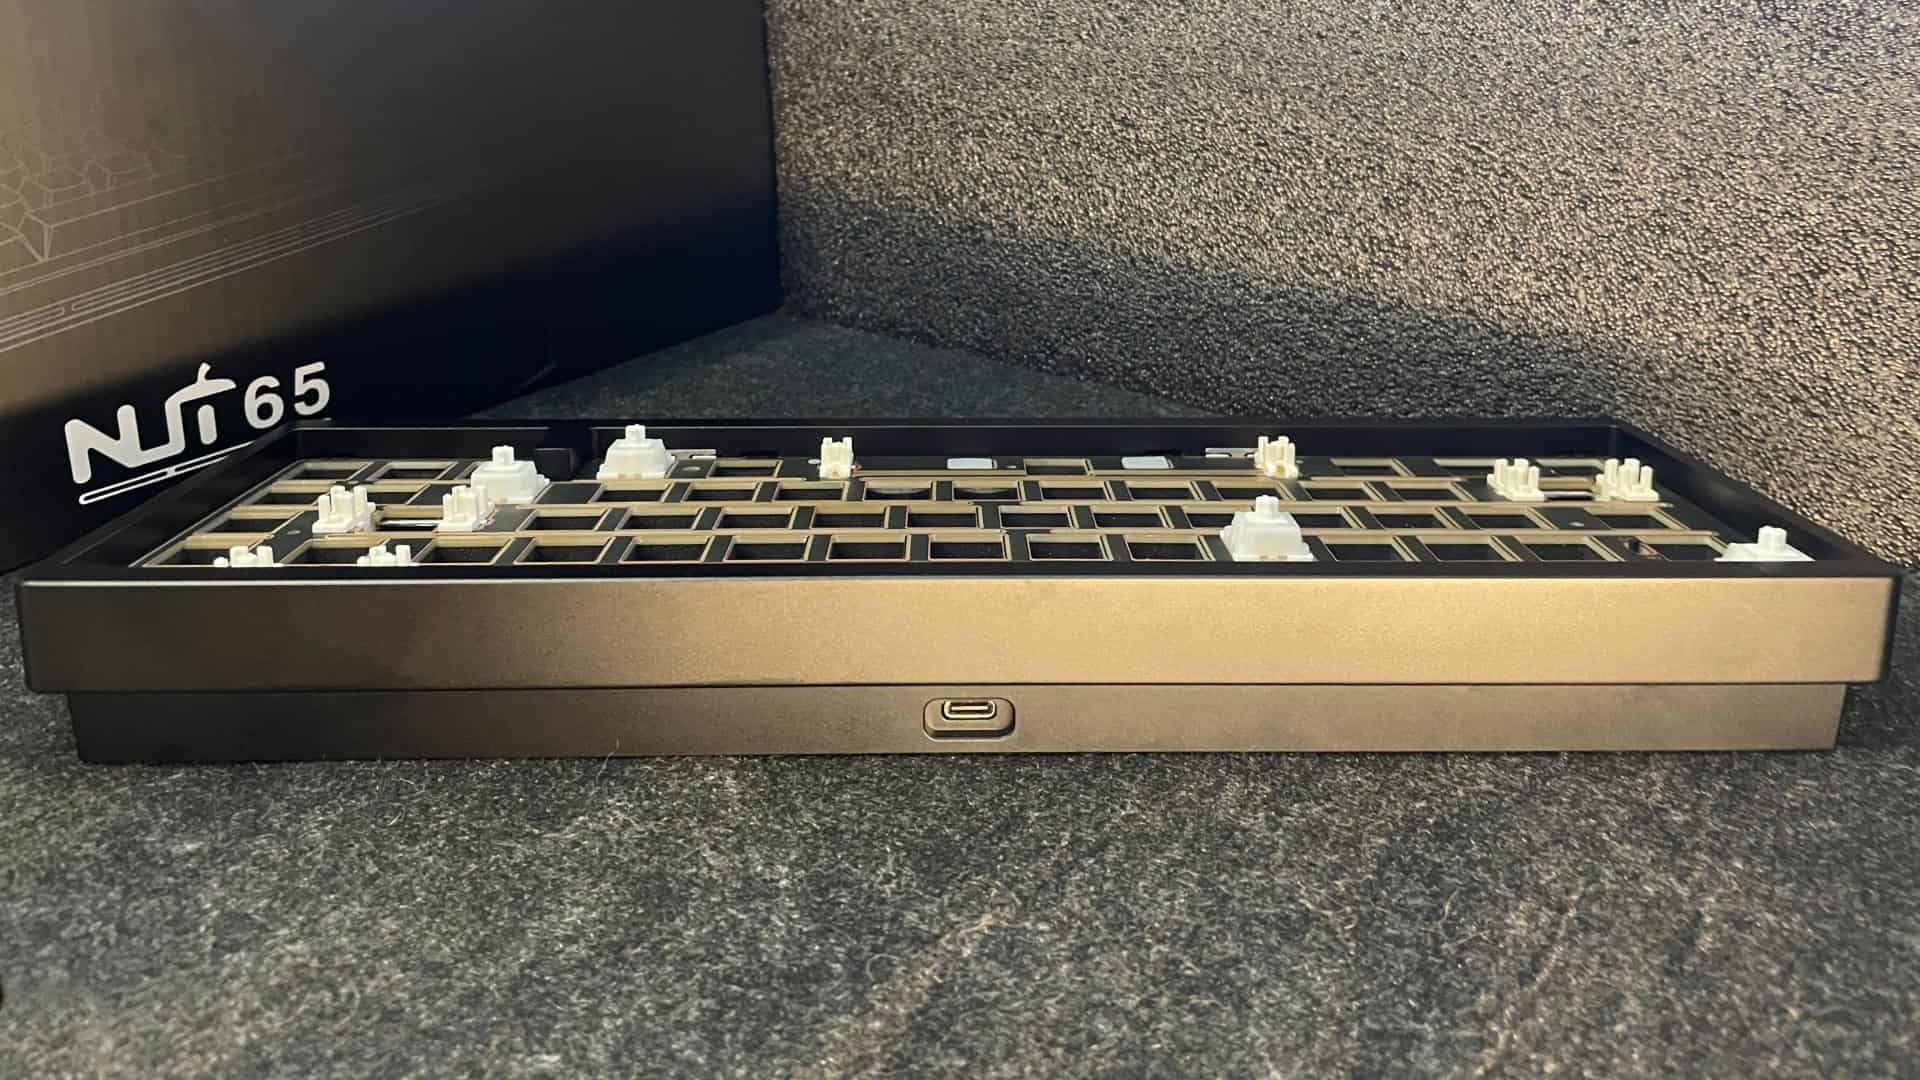
The Weikav NUT65 is a 65% keyboard with 66 keys in an ANSI layout. The typing angle is 7 degrees. Straight out of the box, it greets you with its black plate featuring golden outlines around the switch holes and flex-cuts. It looks very nice and premium. When you pick it up, the weight is immediately noticeable. After all, it weighs approximately 1.1 kg without switches and keycaps.

The case is made of aluminum, CNC-machined and sandblasted with a 220-grit finish. What does this mean? Before the coating process – whether anodizing, electrophoresis, or powder coating – it’s critical to sandblast the case to remove oxides, scratches, and milling defects, and to create a micro-roughness that improves adhesion of the coating. This also prevents blotches or unevenness under the coating.
For us, mechanical keyboard enthusiasts who appreciate tactile and visual feedback from a keyboard, this process provides the key benefit – a smooth, soft-to-the-touch, and visually uniform matte texture. What does the grit number mean? The higher the grit number, the smaller the abrasive particles, resulting in a more delicate and smoother texture. A 220-grit finish provides a surface that is almost silky to the touch. I really appreciate this attention to detail. The case surface is flawless and feels incredibly smooth.
The bezels around the case are quite narrow. The top and bottom bezels are wider, while the sides remain very slim.
There is a lightbar located on the front edge of the bottom case. It supports two lighting modes. The first mode provides preset lighting effects. In this mode, you can choose from six lighting effects, including a steady glow in one of seven colors. You can switch modes using the Fn + Backspace key combination.

The second mode is “Rhythm-Reactive RGB”. In this mode, the lightbar reacts in real-time to sound – music, keystrokes, or ambient noise – thanks to the built-in microphone. There are four lighting effects available in this mode, which can be toggled via Fn + DEL. You can also adjust the microphone sensitivity with Fn + INS, with 30 sensitivity levels to choose from.
The black case has an interesting advantage. The lightbar appears as a black strip. When turned off, it blends seamlessly into the case and is practically invisible. If you don’t plan to use it or dislike having a visible black strip on the other available colors, the black case is your best choice.

At the back of the keyboard, there’s a single USB Type-C port, located in the center. People tend to fall into two camps here: some prefer having connection mode and WIN/MAC toggles at the back, while others dislike the clutter of elements at the back and prefer a clean, minimal look. This is largely subjective, so whether you like this design is up to you.
On the bottom of the keyboard, there are four elongated rubber feet. However, the main eye-catcher is the aluminum weight, featuring a unique twin-nut motif. It looks very nice. To prevent scratches during transport, a protective film is applied.
Next to the weight is a hidden compartment for the 2.4G dongle, covered by an aluminum magnetic cap – a signature Weikav design. I find this very convenient because the dongle is always at hand and harder to lose. The design here is both functional and elegant, with a minimalist touch.
Beneath the dongle compartment, there is an aluminum accent piece with a stylized ‘NUT’ engraving. The 2.4G dongle itself also has the “NUT” logo. This is a small but important detail. Often, dongles have no markings or only the company name, which can cause confusion about which dongle belongs to which device, in case you have many of them. Here, it’s easy to identify that the dongle belongs to the NUT65.

Overall, the keyboard gives a strong impression of a premium product – it’s heavy, well-machined, elegant, and unique. The build quality is high. Nothing creaks or wiggles, and there is no metal ping. Tapping the keyboard’s bottom produces a very muffled sound.
Now let’s talk a bit about ergonomics.
The LED under the Caps Lock key serves as an indicator. When Caps Lock is on, the LED glows solid white regardless of the backlight mode.
It’s also worth mentioning how the CTRL key behaves. By default, the keyboard has battery charge indication enabled. The CTRL key blinks red when the battery is critically low, glows solid red while charging, and glows solid green when fully charged. This indication can be toggled on or off with Fn + Left CTRL. You can check the battery level by pressing Fn + Spacebar.
Switching between WIN and MAC modes is done by holding Fn + M for 3 seconds.
A new minimal latency mode was also added. It’s enabled by holding Fn + D for 3 seconds. The D key lights up red, indicating you’re in minimal latency mode, which is useful for gamers. To exit this mode, press and hold the same key combination again; the D key will glow white, signaling a return to normal mode, which can help extend battery life during longer sessions.

Connectivity and Battery
The keyboard offers tri-mode connectivity: wired, 2.4G via dongle, and Bluetooth. It supports three Bluetooth channels for pairing. You can switch between connection modes using keyboard shortcuts:
- Fn + R = 2.4G
- Fn + T = Wired Mode
- Fn + Q/W/E = Bluetooth channel 1/2/3
To support wireless functionality, the keyboard comes with a built-in 6000 mAh battery. This is higher than the typical 3750–4000 mAh for this form factor, so you can expect longer battery life.
Under the TAB key, there is an ON/OFF switch. But there is no need to toggle this switch every time you want to turn off the keyboard, as it automatically goes into deep sleep mode after a certain period of inactivity. In this mode, the battery drain is negligible. It is used rather to cut power for long-term inactivity or long-distance transport.

Interesting catch – even if the switch is set to the “OFF” position and the board is connected via USB, you can still switch to 2.4G or Bluetooth using key combinations and connect to a remote device. I have tested this, and it works even if the battery is physically removed.
Regardless of the toggle position, connecting the keyboard via USB will start charging the built-in battery. This switch does not interrupt the battery charging circuit.
Software: Unlocking the Potential
The keyboard supports not just one, but two configuration interfaces, which is quite unusual. The first is VIA, and the second is proprietary web driver. Let’s go through them one by one.
VIA is essentially a web-based driver that lets you remap keys in real time, set up layers, assign macros, change preset lighting effects, and create profiles – all without needing to install any extra software. It works directly in your browser regardless of whether you’re using Windows, Linux, or macOS. It’s incredibly user-friendly and convenient.
For more experienced users, there is a wide range of advanced keycodes for creating complex key combinations, implementing media controls, etc. For example, in VIA, you can set up “Tap and Hold” functionality, where tapping a key performs one action, while holding the key performs a different action. This feature allows you to access additional functions on the key without needing to switch layers.
To have VIA detect your keyboard, you’ll need to upload a JSON configuration file (only once), which you can easily download from the manufacturer’s website. VIA recognizes the keyboard in both wired and 2.4G wireless modes.
There are 5 customizable layers available (layers 0–4).
Both Mod-Tap and Layer-Tap features work exactly as they should. For example, I easily configured the TAB key to work as TAB when tapped, and as Fn when held.
Their proprietary web driver is structurally very similar to VIA but offers a slightly different interface. It supports two languages: English and Chinese.
However, this web driver includes functionality that covers some of VIA’s limitations. Specifically, it supports per-key RGB, which allows assigning any backlighting color to any individual key – a feature that will be especially appreciated by those who like to highlight only WASD or other gaming keys. I also found a key debounce time setting, which might come in handy in certain cases.
Personally, I like having access to both web drivers, and since their custom web driver includes features that VIA doesn’t offer, I see it as a step forward and a definite advantage.

Keycaps
This is a barebone kit, so you’ll need to buy and install your own keycaps. However, if you’re looking for matching keycaps, I noticed a set called “NUT Theme” on Weikav’s website, available in four colors.
Personally, I like barebone kits, as I already have too many pre-built keyboards that came with keycaps, which I immediately replaced with aftermarket ones.So in this case, I think it is a plus that the manufacturer offers you to buy the keyboard without keycaps, especially since this lowers the product’s price.
Switches and Stabilizers
The pre-installed stabilizers are plate-mounted. They are very generously lubricated from the factory. The stabilizers are smooth and solid, with no noticeable rattle.

This is a barebone kit, so the board comes without switches. However, to keep the plate attached to the PCB and prevent damage during shipping, 4 switches are pre-installed to hold them together. I believe they are called ‘Flowing Cloud’, and I’m mentioning them only because they are really good. These switches are incredibly smooth, feature an LED diffuser, and produce a pleasant, creamy sound.
Structure and Mounting
The NUT65 hides a lot of interesting things inside. To find out how the internal components are arranged, there’s no longer a need to grab a screwdriver and start unscrewing to take the keyboard apart, because the NUT65 features a ball catch quick-release system. A few seconds and the keyboard is disassembled – just push and click. I really like this solution.

Once you remove the top frame, you can take out the plate/PCB sandwich from the case even more quickly and easily without fear of damaging anything, since there are no cables between the PCB and the daughterboard. The NUT65 uses a magnetic pogo-pin connector, which is another incredibly clever solution. There’s no need to worry about damaging cables, especially fragile ribbon cables. You also don’t have to spend time carefully unplugging cables from the board to avoid damage. You simply lift the plate/PCB sandwich upward. That’s it. To reinstall it, just put it back into its slot and let the magnets in the pogo-pin connector do their job – they will pull the PCB into the correct position automatically.

The appearance of a pogo-pin connector in this price segment is a real breakthrough and one of the unique advantages that the NUT65 offers. If you ask me, the quick-release system and the pogo-pin connector should always go together. They perfectly complement each other, allowing access to the keyboard’s internal components for modding or maintenance in just seconds. Together they’re not just standalone solutions – it’s true synergy. This is a very convenient solution for any mechanical keyboard enthusiast and a step in the right direction. I would even say it’s a new standard that all custom keyboard makers should strive for. These kinds of solutions turn routine maintenance or modification into a pleasure rather than a technical quest – especially for newcomers to the hobby.
Let’s return to our sandwich of the PCB and plate. You can immediately notice that two gasket mount options are available – PCB “silicone socks” gasket mount and plate “silicone beans” gasket mount. Out of the box, the keyboard uses PCB “silicone socks” gasket mount. Having options is always great. So everyone can choose what suits them best – a firmer or more balanced typing experience. The keyboard comes with an FR4 plate with gold outlines around the switch holes and flex cuts.

Weikav also separately offers plates made from different materials:
- POM (Polyoxymethylene)
- FR4 (Fiber Reinforced Laminate)
- PP (Polypropylene)
- PC (Polycarbonate)
- Carbon Fiber
- Aluminum Alloy
An interesting detail is the cutout for installing the stabilizer under the space bar – it’s shifted upwards instead of being centered as usual, and it’s much narrower, designed just to fit the stabilizer wire, nothing more. Essentially, it’s almost as narrow as the flex cuts, only slightly wider. I like this design because it eliminates the need for extra silicone pads that are usually used to cover stabilizer cutout. Below are diffusers for additional LEDs under the spacebar.
Yes! There are four extra LEDs positioned along the entire length of the spacebar. I’ve never understood why such a long key typically has only one LED. So users who use shine-through keycaps, especially those with patterns on the spacebar like “Topographic” and similar designs, will be very happy! This also helps create more stable backlighting across the spacebar area. Nice touch!

The included black PCB is 1.2 mm thick with flex cuts. On closer inspection, you can see that the hot-swap sockets are manufactured by QMSEN. Screw-in stabilizers are not supported. The board supports only the ANSI layout, with no split spacebar or stepped caps lock option.
All LEDs have a south-facing orientation. As someone who is sensitive to backlight flicker, I can confirm that the keyboard’s backlighting is implemented very well – there is no flicker or stroboscopic effect that sensitive users might notice.

Weikav also offers a 1.6 mm non-flex cut PCB on their website. Such a PCB may be interesting for users who prefer a firmer typing experience. The website also states that this PCB includes ESD protection, which is another advantage.
As you can see, there’s a lot of room for experimentation – there are plenty of plate options and even an additional PCB, so everyone can find a setup that suits their preferences. And this is where the keyboard truly shines: thanks to the pogo-pin connector and the ball catch quick-release system, testing different build options is faster and easier than ever, without the hassle of unscrewing/screwing or dealing with cables.
Between the PCB and plate, there are three layers of sound dampening:
- Poron foam
- Poron switch-pad
- PET film
Under the PCB, there are two more layers:
- Poron foam
- PET film
So, in total, the keyboard uses five layers of sound insulation.
Now, let’s move on to the bottom part of the case and see how it’s designed. Improvements are immediately noticeable. There are silicone dampers in all four corners. This is an excellent solution that prevents metallic ping caused by contact between the upper and lower metal parts of the case during typing. These dampers also soften force when reinstalling the top frame after disassembly, preventing scratches between the upper and lower parts.

The lightbar is integrated into the lower part of the bottom case. Another detail worth noting is the internal side of the bottom case – it’s a solid aluminum surface protected by an anti-static film. This positively affects the typing sound compared to keyboards where the internal side has open compartment for the battery and daughterboard. In the NUT65, the battery, daughterboard, and all connections are hidden in their own compartment behind an aluminum backplate. To access it, you need to remove a few screws, after which the backplate can be taken off to reach the battery.
I like this design because when I’m modding a keyboard or testing different layer configurations, I don’t want to see the daughterboard and battery. It also reduces the risk of damaging these components during modifications since they’re safely enclosed in their own compartment. Additionally, I appreciate this design visually – it looks cleaner and more minimalist.

Typing Feel and Sound
The NUT65 produces an extremely satisfying thock. When I first took it out of the box and pressed the pre-installed switches – even without keycaps – I was surprised by how deep and thocky the sound was. I suspect this is due to the generous use of Poron throughout the build. As you may have noticed, all the foam in the keyboard is Poron, which is quite unusual.
Whatever the reason, if you’re chasing that thocky sound profile, the NUT65 is definitely for you. In my build, I used Gateron Milky Yellow Pro V2 switches and achieved an incredibly satisfying, deep thock. Honestly, combined with these switches, this is the thockiest keyboard I’ve ever used.
Differences Between NUT65 and Lucky65 V2
| NUT65 | Lucky65 V2 | |
| Case Finish | 220-grit finish | 180-grit finish |
| Battery Capacity | 6000 mAh battery | 3750 mAh battery |
| Connector Type | Magnetic pogo pin connector | Cable with a JST connector |
| Driver Support | VIA + proprietary web driver | VIA only |
| Mounting Options | PCB & plate gasket mount | PCB gasket mount only |
| Case Dampening | Silicone dampers between top and bottom case | No dampening between top and bottom case |
| Advanced Keycodes | Mod-Tap and Layer-Tap supported | Mod-Tap and Layer-Tap are not supported |
| Latency Optimization | Has minimal latency mode | No minimal latency mode |
| RGB Lighting | Per-key RGB supported via proprietary web driver | Per-key RGB are not supported |
| Debounce Time Configuration | Adjustable via proprietary web driver | Not adjustable |
| Lightbar | Built-in lightbar | None |
| Sound Dampening Layers | Poron + Poron + PET + Poron + PET | Poron + IXPE + PET + EPDM + PET |
| Layout Support | ANSI only, no split spacebar support | ANSI and ISO, split spacebar supported |
| Extra Spacebar Lighting | Additional LEDs under the spacebar | No additional LEDs under the spacebar |
Pros and Cons
Pros:
- Unbeatable price-to-quality-to-feature ratio
- Exceptionally thocky typing sound
- Magnetic pogo-pin connector – impressive for this price range
- Dual gasket-mount support – a big plus for customization enthusiasts
- Dual driver support – expands overall functionality
- Hidden 2.4G dongle compartment – a nice touch
Cons:
- No dust cover included – I would’ve really liked to see one in the box
- Power switch is located under the Tab key – I wish it were in a more accessible location
Final Verdict
With each new iteration, Weikav’s 65% keyboard took a step forward, bringing something new and making the good even better. The Lucky65 V2 was a major success, offering so much that users truly fell in love with it. However, Weikav didn’t stop there – they created something incredible. They managed to create another fantastic keyboard and take yet another step forward in an area where it seemed that only minor tweaks remained. But those very details held the key to a real breakthrough. After all, as I always say – details matter.
They genuinely improved almost every aspect of the keyboard, listening closely to user feedback. You can feel it. From the case, where the finish was emproved and silicone dampeners were added between parts of the case, to the wireless connection , where the battery capacity was increased and latency reduced. From internal engineering solutions – like replacing the cable with a pogo pin connector and supporting dual gasket mount – to firmware improvements such as dual web driver support with expanded functionality. The cherry on top is the built-in lightbar.
The NUT65 lives up to its name – it is truly the most mature and refined Weikav product to date. This keyboard offers everything you could want – a great design, a premium finish, excellent build quality, wide customization options, fantastic software, and a pleasant “thocky” sound profile. And on top of all that, it comes at a very attractive price. The NUT65 might just be the new king of budget 65% keyboards.
You can purchase Weikav NUT65 from Weikav official store for $89-$99. You can use discount code HLPLANET for 5% off.

Controller and mechanical keyboard enthusiast. Tech reviewer, regularly sharing thoughts about gadgets and computer peripherals.


